

Laravel6.0安装pbmedia/laravel-ffmpeg视频转码的经过
2019-10-04 admin laravel 1755
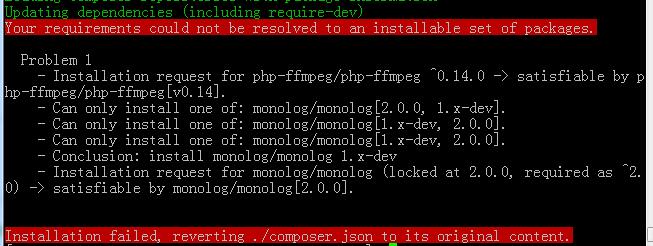
原来准备安装使用最广泛的php-ffmpeg/php-ffmpeg,但安装了一下午也一直报错,经查是不支持laravel6.0以上,在5.8版本安装是成功的。报错如图:
后来,在PHP中文站找到了一个今年发布的组件pbmedia/laravel-ffmpeg,可以正常安装,项目地址:
http://packagist.p2hp.com/packages/pbmedia/laravel-ffmpeg
现将安装过程记录如下。
首先是安装ffmpeg了,非常简单。一条条执行命令,成功后会显示版本号:
sudo yum install -y epel-release rpm
sudo rpm --import /etc/pki/rpm-gpg/RPM-GPG-KEY-EPEL-7          //如果出现缺少Code提示,就执行此条命令
yum repolist          //安装完成之后,可以查看是否安装成
sudo rpm --import http://li.nux.ro/download/nux/RPM-GPG-KEY-nux.ro       //导入一个Code
sudo rpm -Uvh http://li.nux.ro/download/nux/dextop/el7/x86_64/nux-dextop-release-0-1.el7.nux.noarch.rpm        //安装nux-dextop 源
sudo yum repolist      #查看repo源是否安装成功
sudo yum install -y ffmpeg
ffmpeg -version
接下来,安装pbmedia/laravel-ffmpeg
composer require pbmedia/laravel-ffmpeg
编辑config/app.php文件
// Laravel 6: config/app.php
'providers' => [
    ...
    Pbmedia\LaravelFFMpeg\FFMpegServiceProvider::class,
    ...
];
'aliases' => [
    ...
    'FFMpeg' => Pbmedia\LaravelFFMpeg\FFMpegFacade::class
    ...
];
发布静态资源:
php artisan vendor:publish --provider="Pbmedia\LaravelFFMpeg\FFMpegServiceProvider"
使用方法,转换音频或视频:
FFMpeg::fromDisk('songs')
    ->open('yesterday.mp3')
    ->export()
    ->toDisk('converted_songs')
    ->inFormat(new \FFMpeg\Format\Audio\Aac)
    ->save('yesterday.aac');
详细使用方法见下面的博客:
https://protone.media/en/blog/how-to-use-ffmpeg-in-your-laravel-projects
First let's generate a Video model and make sure we create a controller and database migration as well:
php artisan make:model Video --migration --controller
Since this is an example app, the database migration is quite simple.
Schema::create('videos', function (Blueprint $table) {
    $table->increments('id');
    $table->string('title');
    $table->string('original_name');
    $table->string('disk');
    $table->string('path');
    $table->datetime('converted_for_downloading_at')->nullable();
    $table->datetime('converted_for_streaming_at')->nullable();
    $table->timestamps();
});
Personally I don't use Eloquent's mass-assignment protection so I define the $guarded property of the Video model as an empty array and fill the $dates property with the two datetime columns.
class Video extends Model{    protected $dates = [        'converted_for_downloading_at',        'converted_for_streaming_at',
    ];    protected $guarded = [];
}
HTTP layer
Before we can start working on the controller, we need a form request class to validate the user's input. I prefer to keep validation rules out of the controllers but that's just a personal preference. You could perfectly put the validation logic in your controller. Besides the form request class, let's generate two job classes so we can queue some video processing.
php artisan make:request StoreVideoRequest
php artisan make:job ConvertVideoForDownloading
php artisan make:job ConvertVideoForStreaming
Make the authorize method of the StoreVideoRequest class returns true (or implement your own authorization logic) and fill the rules method with the necessary rules. Replace the mime types with the actual types you want to support.
public function rules(){    return [        'title' => 'required',        'video' => 'required|file|mimetypes:video/mp4,video/mpeg,video/x-matroska',
    ];
}
Alright now it's time for the controller. We'll use a store method to upload the video file, save it to the database and dispatch the jobs. The learn more about queues and jobs, please visit the Laravel documentation. In this example I'll return a JSON response containing the ID of the video but of course you can implement your own response. Don't forget to register this route in your routes file!
 'videos_disk',            'original_name' => $request->video->getClientOriginalName(),            'path'          => $request->video->store('videos', 'videos_disk'),            'title'         => $request->title,
        ]);        $this->dispatch(new ConvertVideoForDownloading($video));        $this->dispatch(new ConvertVideoForStreaming($video));        return response()->json([            'id' => $video->id,
        ], 201);
    }
}
FFmpeg conversions
For the first conversion I want a low-bitrate and resized version of the video. Install the FFmpeg package via composer and add the service provider and facade to your config files. Some of the opened issues on GitHub concern Facades. Please read the Laravel documentation about Facades carefully! Also take a look at the laravel-ffmpeg.php configuration file and especially the binaries settings. As you can see, the package allows you to chain all the methods but I added some comments to show you what's going on.
video = $video;
    }    public function handle()
    {        // create a video format...
        $lowBitrateFormat = (new X264)->setKiloBitrate(500);        // open the uploaded video from the right disk...
        FFMpeg::fromDisk($this->video->disk)
            ->open($this->video->path)        // add the 'resize' filter...
            ->addFilter(function ($filters) {
                $filters->resize(new Dimension(960, 540));
            })        // call the 'export' method...
            ->export()        // tell the MediaExporter to which disk and in which format we want to export...
            ->toDisk('downloadable_videos')
            ->inFormat($lowBitrateFormat)        // call the 'save' method with a filename...
            ->save($this->video->id . '.mp4');        // update the database so we know the convertion is done!
        $this->video->update([            'converted_for_downloading_at' => Carbon::now(),
        ]);
    }
}
Now let's create the second job! The beauty of HLS is that you can specify multiple bitrates. Here's a quote from Wikipedia:
To enable a player to adapt to the bandwidth of the network, the original video is encoded in several distinct quality levels. The server serves an index, called a "master playlist", of these encodings, called "variant streams". The player can then choose between the variant streams during playback, changing back and forth seamlessly as network conditions change.
The package handles all the playlist stuff for you. The only thing you have to do is specify the different formats.
video = $video;
    }    public function handle()
    {        // create some video formats...
        $lowBitrateFormat  = (new X264)->setKiloBitrate(500);
        $midBitrateFormat  = (new X264)->setKiloBitrate(1500);
        $highBitrateFormat = (new X264)->setKiloBitrate(3000);        // open the uploaded video from the right disk...
        FFMpeg::fromDisk($this->video->disk)
            ->open($this->video->path)        // call the 'exportForHLS' method and specify the disk to which we want to export...
            ->exportForHLS()
            ->toDisk('streamable_videos')        // we'll add different formats so the stream will play smoothly
        // with all kinds of internet connections...
            ->addFormat($lowBitrateFormat)
            ->addFormat($midBitrateFormat)
            ->addFormat($highBitrateFormat)        // call the 'save' method with a filename...
            ->save($this->video->id . '.m3u8');        // update the database so we know the convertion is done!
        $this->video->update([            'converted_for_streaming_at' => Carbon::now(),
        ]);
    }
}
If you want to stream the HLS export in a browser, take a look at this package. It adds HLS support to the excellent Video.jsHTML5 video player, even for browsers that don't support HLS natively. When the processing of the video is done you can easily create URLs of the downloadable and streamable versions:
use Illuminate\Support\Facades\Storage;
$downloadUrl = Storage::disk('downloadable_videos')->url($video->id . '.mp4');
$streamUrl = Storage::disk('streamable_videos')->url($video->id . '.m3u8');
That's it! Check out the GitHub repository to find some more examples and follow me on Twitter (@pascalbaljet) to stay updated!
/**保存后回调,进行转码,报错Unable to load FFProbe解决办法:
修改config/ffmpeg.php为'default_disk' => 'admin',
.env加上
FFMPEG_BINARIES=/usr/bin/ffmpeg
FFPROBE_BINARIES=/usr/bin/ffprobe
再次报错Encoding failed,去除vendor/php-ffmpeg/php-ffmpeg/src/FFMpeg/Media/AbstractVideo.php中的 try 和catch调试:
ffmpeg failed to execute command '/usr/bin/ffmpeg' '-y' '-i' '/www/wwwroot/blog.dzbfsj.com/public/uploads/aa.mp4' '-threads' '12' '-vcodec' 'libx264' '-acodec' 'libfaac' '-b:v' '1000k' '-refs' '6' '-coder' '1' '-sc_threshold' '40' '-flags' '+loop' '-me_range' '16' '-subq' '7' '-i_qfactor' '0.71' '-qcomp' '0.6' '-qdiff' '4' '-trellis' '1' '-b:a' '128k' '-pass' '1' '-passlogfile' '/tmp/ffmpeg-passes5d986bf45b357kin79/pass-5d986bf45b3cb' '/www/wwwroot/blog.dzbfsj.com/public/uploads/aaa.mp4'
错误位置在vendor/pbmedia/binary-driver/src/Alchemy/BinaryDriver/ProcessRunner.php第100行
       throw new ExecutionFailureException(sprintf(
            '%s failed to execute command %s', $this->name, $command
        ), $e ? $e->getCode() : null, $e ?: null);
**/